Sunday, March 16, 2014

You're Gonna Want To See This!

I have to be honest.  Until about 3 years ago, I never knew that so many things could be homemade and made with things that I already have in my pantry!  I get very excited when I find a new recipe of things to make.  And as everyone knows, if you make it at home, it tastes so much better!  This recipe is no different.

Are you ready?

Are you sure??

Here it is!!!!

HOMEMADE MARSHMALLOW FLUFF!!!!!!

Oh yeah, that was NOT an error.  I made this today and I almost couldn't stop eating it right out of the jar.  :)

So here's what I did...

Ingredients:
3 large egg whites
1/3c water
2/3c plus 2T sugar
3/4c light corn syrup
1t pure vanilla extract

* Place egg whites in a large mixing bowl. Using an electric mixer with a whisk attachment, beat the egg whites until light and frothy.

* Keep the mixer running and slowly pour in 2 tablespoons of sugar. Continue to beat until soft peaks form.

* Meanwhile, combine 1/3 cup water, corn syrup, and remaining 2/3 cup sugar in a large saucepan over medium heat. Bring to a boil and continue to cook, stirring occasionally, until it reaches 240°F (it will take 10-15 minutes)

 * Turn mixer on to low and slowly pour syrup down the side of the bowl into the egg white mixture.

* Increase speed to high and beat mixture for 6-8 minutes. Pour vanilla into mixture and beat on high for around 2 more minutes, until mixture looks like marshmallow fluff.

*Let cool and then pour into air-tight container and store in fridge for up to a month.


**Don't forget to lick the whisk!!!  Don't let any of this go to waste!

Saturday, March 15, 2014

Mozzarella Cheese...Made From Scratch

Yep, you can make this stuff at home and it is SO much better than the cheese that you get from the store.  But then again, isn't everything??  Oh and did I mention that you can make it in under and hour?

Here's what you need:

1 gallon whole milk- leave out to reach room temperature, do not use ultra-pasteurized
1/4t liquid rennet
3/4c bottled water, unchlorinated, room temperature
1 1/2t citric acid
1t salt
ice

You're going to need a few specific items too.

stainless steel pot, large enough to hold the milk and water
candy thermometer
colander/strainer or cheese cloth (I use both)
slotted spoon
microwave safe bowl, medium size
and last, but not least, a microwave

Now, here's what you do:

* Add citric acid to water then add to gallon of milk in pan. (Here's what it'll look like.  You should see a lot of "chunks".  This time, chunky milk is a good thing!)
*  Heat SLOWLY ON A LOW HEAT to 90-92 degrees Fahrenheit and remove from heat.
* Add 1/4t of liquid rennet, stirring slowly for a few seconds.
* Cover and leave for 30 minutes or until you see the curd has set and it will ‘break’ when cut. (You will know this by putting your finger into the curd and being able to pull it open without it sticking to you.) 
* Cut the curd with the knife into 1 inch (approx) squares and leave for five minutes, to help the curds continue to form.
* Put back on heat and bring up to 105 degrees Fahrenheit (careful not to go over 110 degrees and beyond, it will start to cook it!). The whey will continue to be extracted from the curd.
*  Lift the curds into the strainer/colander using the slotted spoon, allowing as much whey as possible to drain back into the pot as you transfer the curd. Leave for 5 minutes.
* Using your hand, hold the curd and drain off the rest of the whey (pressing gently) and transfer to a bowl. (If using a cheesecloth, lift it and twist the top gently to apply slight pressure.)
* Microwave for 1 minute, and remove. Drain the whey, again using your hand to press out the curd a little to help with removing the liquid. NOTE: BE CAREFUL, USE CAUTION AS CURD CAN GET EXTREMELY HOT. IF IN DOUBT, USE RUBBER GLOVES.
* Knead gently, folding the curd into itself a few times. Microwave again for 30 seconds. (Drain whey as you go)
* Remove from microwave, drain whey, and repeat kneading of curd. If it begins to stretch, start to work the mozzarella by stretching it out. If it is breaking up, microwave again for 20 seconds until it is soft and pliable. Always drain off surplus whey as you work.
*  Add the salt and work it into the ball of cheese by kneading and folding the cheese into itself again. Knead into a ball and it should become shiny and smooth to the eye. If it breaks apart reheat again for 20 seconds, it must remain smooth and supple.
 * Place in a ice bowl for 15 minutes to cool it.
*  Eat and joy, or store wrapped in plastic wrap for up to one week. However, eaten straight away when fresh will be best!

My notes***

-I have made cheese a few times and just when I thought that I was messing it up and needed to toss it, I found a solution.  I take a wooden spoon after the second time in the microwave and I stir.  Eventually, it'll come together.  Start stretching and kneading and draining the whey.  All will be fine!

-I don't always form my cheese in a ball, but you can.  I shape it into what will be easiest for me to slice or cube for whatever recipe I'm going to use it in.

-You can get a product called Junket Rennet and it's usually in the ice cream topping section.  I have to say, this has NEVER worked for me.  To me, the name is right, it's "junk".  But, who knows, it may be ideal for you.  I ordered my rennet online after trying and failing at making 5 batches of cheese.  Yeah, that happened...in one day.  Anyways, if you use the Junket, I would use 1/2 tab or more dissolved in about 1/4c bottled water.

-When you're draining the whey, if you do it in the sink, it can be quite messy, especially your first or second time.  You will soon find out the cheese curds will get everywhere and are not so easy to clean up.  What I did was spray my empty since with Pam.  That way, all I had to do was rinse the sink out and wipe it down and all the curds were gone!

Ok, what are you waiting for??  Get to the store and get in that kitchen!!

:)


Thursday, March 13, 2014

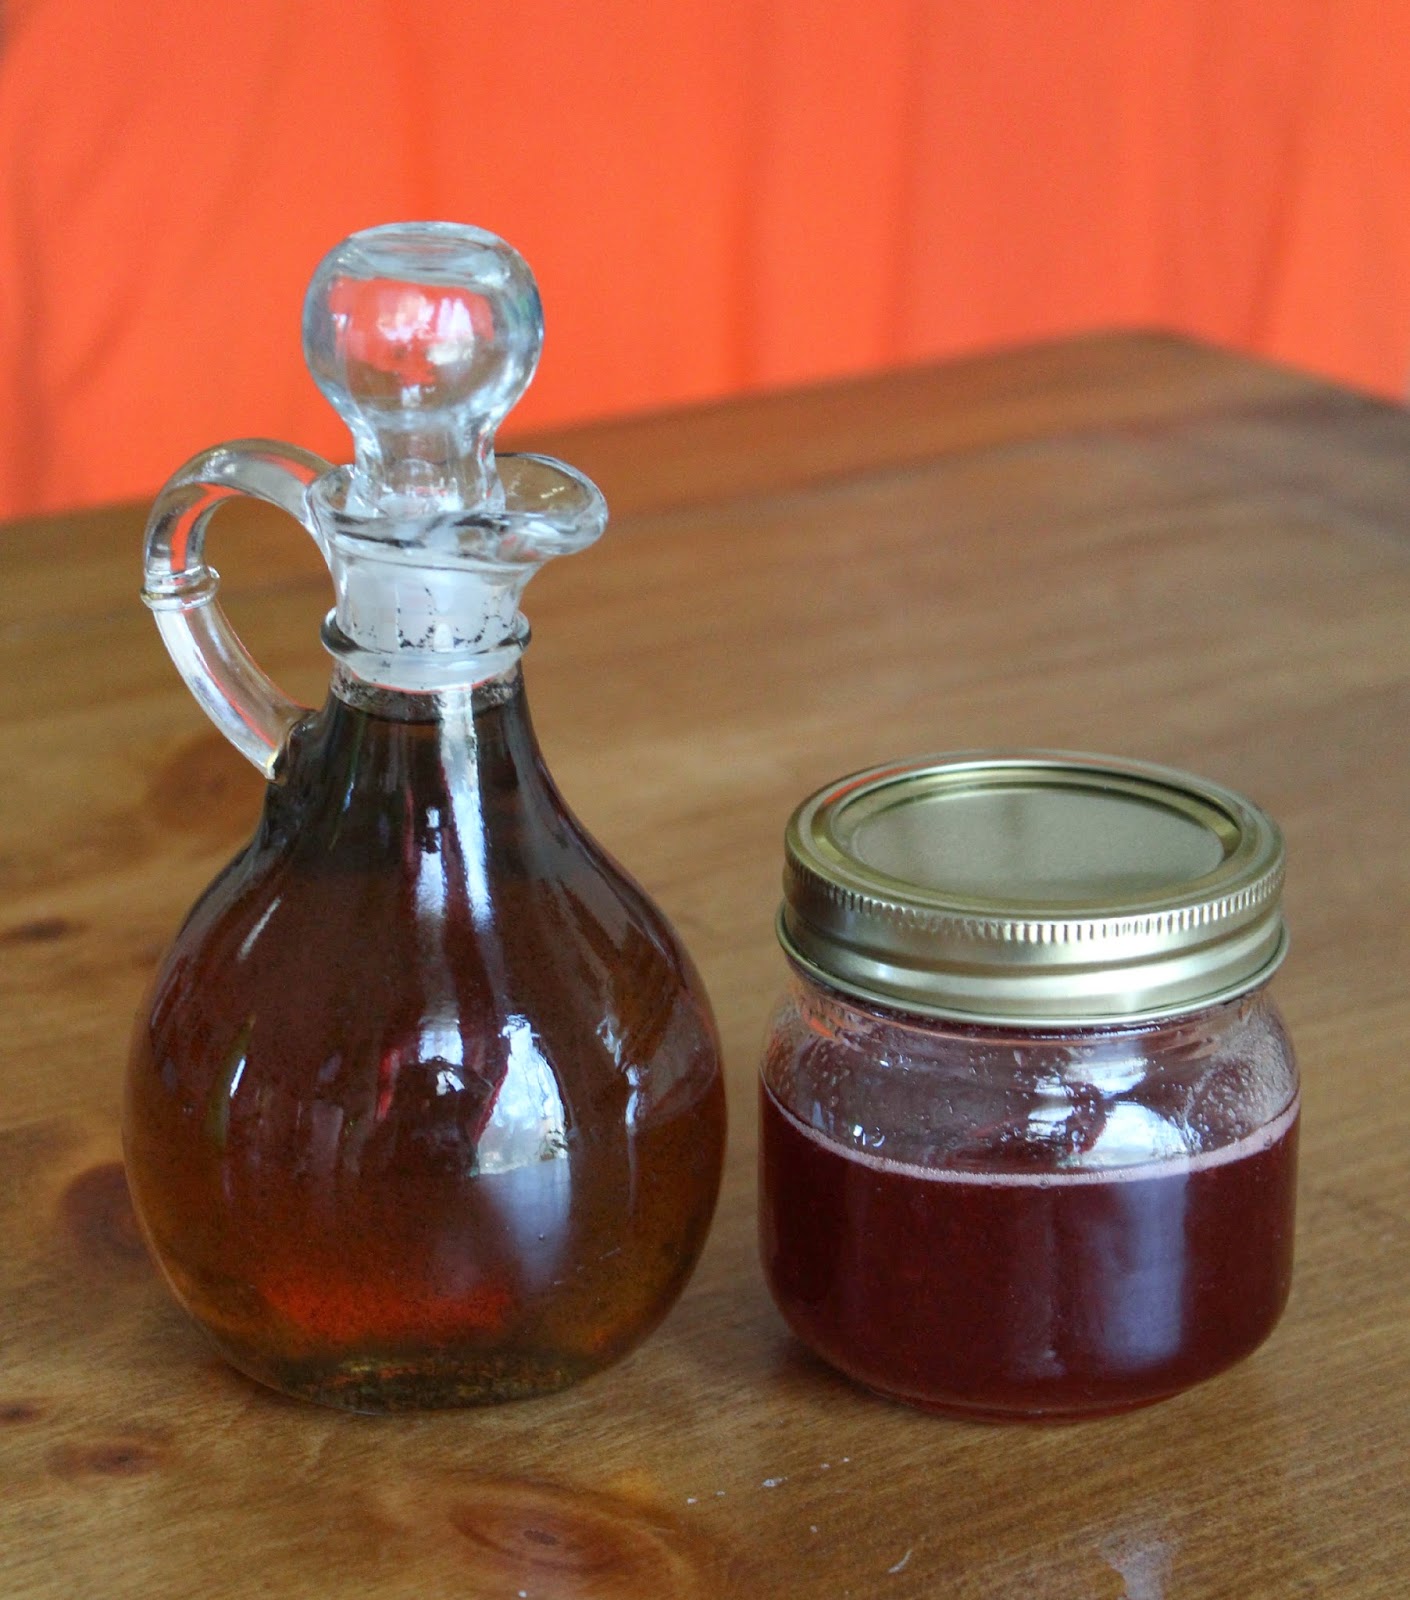
Homemade Strawberry and Vanilla Syrups

I see homemade chocolate syrup recipes all the time on Pinterest or on Facebook, but I have never seen any for vanilla or strawberry.  What are they...chopped liver? 

If you're like me, chocolate is not exactly your "go to" flavor.  I rarely even use anything that's strawberry flavored because it's usually artificially flavored and it never really tastes like strawberry.  However, this recipe uses real strawberries and no strawberry extracts!  YUM!! 

So here we go...

First, I made the vanilla syrup.  Here's what you need:

1 3/4c water
1 1/2c sugar
1/4c brown sugar
1 1/2T vanilla paste

Combine all, except vanilla paste, in a medium saucepan and cook on medium heat.  When it starts to boil, start your clock.  Boil for 10-15 minutes and then remove from heat.  Stir in vanilla bean paste.  Let it cool some and then put it in whatever container you're gonna use.  (I put mine in a fancy syrup thing thinking I had 2, but sadly, 1 was lost.  Very sad day.)  Use it like you would the name brand syrups that you used to buy.  ;)
Next up: Strawberry Syrup

Here's what ya need:

1c sliced, frozen strawberries
1/2c sugar
1/2c water
1/4t pure vanilla extract

Add water, strawberries and sugar to a small saucepan and bring to a boil over medium heat.  When it starts to boil, start your timer again and boil for 10-12 minutes.  Remove from heat and add vanilla.  Let it cool slightly and strain into whatever container you're going to use.  You can use the strawberries later for yogurt or ice cream or whatever you want just so they don't go to waste.
My notes:

*Vanilla bean paste: not to be confused with vanilla beans or vanilla extract.  It's kind of a combo of the two.  It's like a thick extract with vanilla bean specks in it.  It is oh so good!!

*Let both syrups come to room temperature before you use them.  They should be good and thickened up by then.

Enjoy!!


Thursday, February 27, 2014

Pasta: Made From Scratch

Don't panic, it's easier than you think, I swear!

I've always wanted to make homemade pasta, but every recipe that I found called for semolina.  I searched and searched every grocery store that I ever walked in and I never found it.  So, eventually, I gave up.  Then, one day I was watching the Food Network and one of the chefs was making pasta...with all purpose flour!!  My heart literally jumped for joy!!

My first mission now, was to get the pasta roller kit for my KitchenAids. I mean, if I don't have to roll the dough out by hand, why should I?  So, off I went to search the local stores.  After 2 weeks of searching and realizing that I would have to order it from online in order not to have to amputate my left arm to purchase it.  I was deciding which store/site I was going to buy the kit from and while walking through Wal-mart, I saw one on the shelf.  Were my eyes deceiving me?  Could this be true?  I could buy the kit right now and not have to wait for it to be ship?  Why, yes, yes I could!  The pasta gods were definitely smiling on me that day.

Mission 2: drying rack.  I pretty much knew that this was going to have to be ordered online since I didn't see one anywhere while I was comparison shopping for the kit.  I checked a few stores anyways, just in case.  I had seen a rack once while online and it was $13 plus shipping for one rack.  I had a feeling that I would need 2 since I know that each batch of pasta dough makes a lot.  That would mean $26 plus shipping plus more waiting.  I didn't want to do that because I was itching to make this pasta!  So, I got creative.  I went to the laundry section where they have clothespins and hangers and such and I found it.  A dryer rack.  Who says drying racks are just for clothes?

So, now I'm ready.  Ready to make my first ever batch of pasta.  Here's the recipe...

  • 2 cups flour
  • 3 eggs
  • 1/2 teaspoon salt
  • 1/2 teaspoon extra-virgin olive oil

  •  Mound the flour on a clean work surface. Hollow out the center making a well in the middle of the flour with steep sides.

    Break the eggs into the well. Add the salt, and olive oil to the hollow center and gently mix together with a fork. Gradually start incorporating the flour by pulling in the flour from the sides of the well. As you incorporate more of the flour, the dough will start to take shape.


    With your hands or a bench scraper continue working the dough until it comes together. If the dough is too dry, add a little water; if too wet or sticky, add a little flour.

    Begin kneading the dough and keep kneading until it becomes smooth and elastic, about 8 to 10 minutes. At this point, set the dough aside, cover it with plastic, and let it rest for 15 to 20 minutes. You can store the dough in the refrigerator for up to 24 hours, but allow it to return to room temperature before rolling it out.


    Divide the pasta dough into 4 even sections. Keep each section covered with plastic wrap or a clean towel while you work with each one. Flour the dough, the rollers of a pasta roller (or your rolling pin), your hands, and the work surface.

    If using a pasta machine: Flatten 1 of the of the dough pieces between your hands or with a floured rolling pin until it forms a thick oval disk. Dust the disk, the roller, and your hands with additional flour. Flour a baking sheet to hold the rolled out finished pasta.

    With the roller on the widest setting, pass the pasta through the machine's rollers a few times until it is smooth. Fold the dough over into 1/3, and continue to pass through a few more times until the pasta is smooth again. Begin adjusting the pasta machine settings to become thinner, passing the dough through a few times at each setting.


    If rolling the pasta by hand: Flatten a dough piece into a thick oval disk with your hands. Flour a baking sheet for the rolled out finished pasta. Place the oval dough disk on a floured work surface, and sprinkle with additional flour. Begin rolling out the dough with a floured rolling pin working from the center of the dough outwards, constantly moving the dough and lifting it to make sure it's not sticking.


    That's it!  Now all you have to do is dry it, freeze it or cook it!  I made my first batch so I could post on here and now I'm going to make more for dinner.  :)

    Don't forget to experiment and add flavors or herbs or ANYTHING!  Add them to the eggs before you incorporate the flour, though.  If the dough is too dry, just add a little water.  Too wet, add a little flour.

    Have fun!


    Wednesday, February 5, 2014

    Lava Isn't Just For Volcanoes Anymore!

    Almost any sit-down restaurant you go to nowadays has a lava cake on their menu.  If you're like me, you tried to figure out how to make them thinking it would be hard.  Trust me, they aren't hard to make at all.  Now, if you're still like me, sometimes a plain ol' chocolate lava cake just isn't want you want or what you have a hankerin' for.  How about a caramel apple one...with vanilla ice cream...garnished with a caramel drizzle and powdered sugar?  That may just hit the spot!

    I acquired this recipe a few years ago, and like any home cook, tried it out on my guinea pig...er... family.  I'm not surprised to say that it was a hit!  Here's how the recipe goes...

    Ingredients:
    2 tablespoons cinnamon graham cracker crumbs (2 squares)
    3 whole eggs
    3 egg yolks
    3/4 cup packed brown sugar
    1 cup caramel topping, plus more for drizzle
    1/2 cup Gold Medal all-purpose flour
    3/4 cup chopped peeled apple
    powdered sugar, if desired

    Directions: 

    Heat oven to 450°F Spray bottoms and sides of 6 (6-oz) custard cups with baking spray with flour. Sprinkle 1 teaspoon cracker crumbs onto bottom and around side of each cup.

    In large bowl, beat whole eggs and egg yolks with wire whisk until well blended. Beat in brown sugar. Beat in caramel topping and flour until well blended. Stir in apple. Divide batter evenly among custard cups. Place cups on cookie sheet with sides. 
    Bake about 15 minutes or until sides are set and centers are still soft but not liquid (tops will be slightly puffed). Watch carefully—cakes can overbake quickly. Remove from cookie sheet. Let stand 3 minutes.
    Run small knife or metal spatula along sides of cakes to loosen. Immediately place heatproof dessert plate upside down over top of each cup; turn plate and cup over. Remove cup. Sprinkle cakes with powdered sugar and drizzle with more caramel (if desired). Serve warm and with ice cream!
    The picture above was before the ice cream and drizzle.  I just wanted you to see it in all it's wonderful ooey gooey awesomeness!

    Monday, February 3, 2014

    Pin And Tweet

    I'm now on Twitter!!!!  Follow me at https://twitter.com/AngelHKirk

    I've been on Pinterest, who hasn't, but I FINALLY added a blog board.  :)  You can follow me there too.
     http://www.pinterest.com/mylittlebitty/my-bloggy-blog/

    I'm so excited to finally expand to a bigger audience!

    Happy pinning and tweeting y'all!


    Goop And Glue...Cake Decorating Essentials

    If you're ever out of baking spray, you know, the spray that has the flour in it, I have a solution for you.  Make some goop.  Funny name, I know, but you can make it out of things that I bet you already have in your kitchen.  All you have to go is mix together equal parts of flour, vegetable oil and shortening.  Whisk it until smooth and put it in a container with a lid.  Now just store it in your fridge until you need it.  If by chance it separates, just mix it back together.  The jar size that I made lasted for about 5 months. 

    I used...

    1/3c flour
    1/3c vegetable oil
    1/3c shortening

    I then placed it in a half pint mason jar with a lid and stored it in my refrigerator.  Whenever you need it, use a pastry brush (or napkin) and dip it in the goop and brush onto the pan.  Use enough to cover the pan completely without using too much.  A little goes a long way!


    Now, on to the glue.  Edible glue that is.  This is really good for gumpaste or fondant decorations that you need to stick together or onto a cake.  This works MUCH better than using water.  All it is, is tylose powder and water.  There's no real measurement to this, just remember that a little tylose powder goes a long way.  I used a very small container, filled it with water, added a very small amount of powder and mixed with a fork.  If it gets too thick, just add more water because your water to tylose powder ratio is off.  No big deal.  When you're done, put the lid on a store it in the fridge.
     

    Another edible glue (which I didn't make for this blog) is using fondant and adding water to make a paste.  More like the consistency of the white school glue.  You can store that in your fridge as well.  This, too, works better than using water to adhere your decorations.


    Sunday, February 2, 2014

    Dutch Oven Bread

    That's right, bread made in a Dutch oven. 

    I got a Dutch oven for Christmas and since then I have been looking for recipes so I can utilize it more.  On Pinterest (which, if you know me, you know I am VERY fond of) I found a recipe for bread.  I was shocked, to say the least.  I would never have thought that I could use a Dutch oven to make bread.  And 4 ingredients??  No way! 

    Last night, I decided to give it a go.  It takes a while to rise (12-18 hours) so I definitely needed to start this at night for the next day.  I assembled my ingredients, covered the bowl and placed it in the oven and forgot about it until I needed to start baking.

    While it was baking, my house smelled so good!  Who doesn't love the smell of baking bread that they made from scratch?  Oh, and a major plus... the bread is a crusty one!  Great for soups or stews or just with homemade butter.  **Yes, I make my own butter as well. ;)**

    Here's the recipe...

    Ingredients...

    3c bread flour
    1t active dry yeast
    1t salt
    1 1/2c warm water

    Directions...

    1. Whisk flour, yeast and salt in a 3-4 quart bowl with a tight fitting lid. If you don't have a bowl w/lid use plastic wrap on a bowl. Add the water and stir with a wooden spoon until the dough is mixed well. The dough will be quite sticky and rough looking, but that's OK. Cover the bowl and set aside for 12-18 hours,(up to 24) overnight is fine.
     
    2. Preheat oven to 450 degrees. Place a cast iron Dutch oven with the lid into the oven while preheating and heat the pot/lid for 30 minutes. Meanwhile, scrape the risen dough from the bowl onto a heavily floured surface. (Dough will still be very sticky.) With floured hands, gently shape the dough into a round loaf, making sure there's enough flour on the surface so dough doesn't stick. Let the dough just sit there until you're pot is preheated.
     
    3. Take the hot pot from the oven and gently place the dough into the pot. Cover with the lid and return to the oven and bake for 30 minutes. Remove the lid at that time and return the pot to the oven for another 10-15 minutes. Gently shake the loaf onto a cooling rack and enjoy the beautiful aroma. Give it a chance to cool before cutting into the loaf. 


     I absolutely LOVE the rustic look of this bread!  Oh, and in case you were wondering, the bread doesn't stick to the Dutch oven.  Not at all.  


    Enjoy!

     
     http://www.justapinch.com/recipes/bread/other-bread/the-best-crusty-bread-dutch-oven.html

    Wednesday, January 29, 2014

    Single Serve Pies

    This is my second blog for the day.  (Look at me, being all productive and stuff!)  I thought that I would share something else that I made today and it's not exactly a "recipe", but an idea. 

    I have had these small pie making tools in my possession for a while and since we are still staying inside, I decided that it was time to put them to use.  The metal one is from Pampered Chef (I have no idea how I acquired this or even how long I've owned it).  It was more than likely supposed to be for a sandwich to seal them and cut the crust off like those yummy ones that are sold in the freezer section, but I thought it would work just as well for mini pies.  The other is one that I found at Wal-mart and I believe it was only $4.88.  Oh, and it's made by Wilton.


    This is what the Wilton one looked like out of the box and opened...


    I also had a can of caramel apple pie filling in the pantry and made sure that I put it to good use.  All I needed now was pie crust.  Now, I could have just as easily made my own, but since my wife was going to the store anyways, I had her pick up a pre-made one and make my life just a tiny bit easier.


    All that was left now was a little egg wash and some cinnamon sugar mixture.  I rolled out the crust and used the Wilton pie cutter to cut the circles that I needed.  I then filled the crusts with filling (2 tablespoons), brushed egg wash on the edges to seal the crusts and pressed the pie maker closed.  Then, brushed with egg wash on the top, sprinkled on the cinnamon sugar mixture and pricked with a fork so that the steam escapes.  Viola!  Pie.  I then placed them on a baking sheet lined with a silicone mat and placed in a 400 degree oven until golden brown.  My brother in law said that they taste pretty close to the ones that a popular taco place sells. And since I love those, that made my day!


    Red Velvet Cherry Dump Cake

    If you've never had or never heard of dump cake, you're missing out.  I make several dump cakes every years because it's just SO GOOD! 

    While I was scrolling through Facebook this morning since we were basically on lock down because of the weather, one of the pages that I "like" was showing this recipe for a red velvet dump cake.  So since I had nothing better to do today, I thought, "Why not?".  Here's the link and the recipe from the site with the pictures from the one that I made...

    http://www.culinaryconcoctionsbypeabody.com/2014/01/28/red-velvet-cherry-dump-cake/


    Ingredients
    • 2 cans (21 ounces each can) cherry pie filling
    • 1 box Red Velvet Cake Mix (I used Betty Crocker)
    • 1 cup unsalted butter, melted
    • 1 ½ cups sweetened coconut
    Instructions

    Preheat oven to 350F.
    Spray a 9x13 inch pan with baking spray.
    Dump the two cans of cherries into the pan. Spread with a spatula to make even.


    Sprinkle cake mix over the cherries, doing your best to evenly distribute the mix. 


    Pour butter evenly as best you can over the cake mix.
    Sprinkle the coconut on top of the butter covered cake mix. 
     
     
    Bake for 50-60 minutes. 
     

    Remove from oven. You can serve dump cake warm or cold.
     
    I haven't cut into mine yet so I can't show you want the inside looked like, but what I can tell you is that my house smelled yummy for at least 2 hours!  


    Tuesday, January 28, 2014

    Easy Peasy Candy Making

    When the whole state has basically shut down because of a little snow, what do you do?  Well, what I did was make homemade butter rum candy.  This is WAY easier than you would think and one of the very first recipes that I've ever done.  Oh, and the best part of the whole thing?  I made it in the microwave.  Yep, sure did!


    I can't take credit for the recipe itself because it's on the package insert of LorAnn oils.  I did, however, follow my own directions because I wanted "pretty" candy.  Here's what the insert says...

    Microwave Hard Candy

    1c granulated sugar
    1/2c light corn syrup
    1/2 dram (1/2t) LorAnn Gourmet Flavoring
    food coloring (optional)
    powdered sugar (optional)

    Thoroughly mix sugar and light corn syrup in a 4 cup microwave-safe glass measure.  Cover with plastic wrap.  Microwave in high for 3 minutes 10 seconds.  Remove from microwave and carefully remove plastic wrap.  Quickly stir the sugar mixture and then cover with a new sheet of plastic wrap.  Microwave on high for 3 minutes 10 seconds.  Remove from microwave, carefully remove plastic wrap and stir.  Use caution to avoid rising steam.  Stir in coloring and then flavoring.  Pour syrup quickly, but carefully, into lightly oiled lollipop molds or onto greased cookie sheet (score at once to mark squares; break into pieces when cool). Let candy cool until hardened.  When cool, dust with powdered sugar to keep from sticking.  Store in an airtight container.

    Here's what I did differently...

    I added the coloring to the sugar and syrup mixture before I placed it in the microwave.  I only cooked the sugar mixture for 3 minutes each time.  After the second cycle, I added the flavoring and then stirred the mixture until it started to thicken.  I then poured the mixture on a silicone mat so that I could "fold" it into itself (using the mat), making a log.  The idea was to add air to the candy.  When I could finally touch it and form it into a log, I began pulling it.  The more air, the better.  Then I divided the candy log in half and rolled it out to the thickness that I wanted and then took my kitchen scissors and cut it into pieces.  I then spread the candy out on another silicone mat, in an even layer, to finish hardening, making sure not to let the pieces touch.  After they hardened, I put them in a ziploc bag and sprinkled with powdered sugar and shook.  That's it!

    My notes:

    -I wore rubber gloves when I was pulling the candy.  This helps protect your hands, somewhat, from the heat and getting burned. 

    -If your hands get too hot and start to burn, touch your hands to your shoulders.  (Left hand to left shoulder, right hand to right shoulder)  The pain will almost instantly go away.

    -Make sure that you work quickly, but carefully.  If the candy starts to get too hard while you're trying to form it, pop it in the microwave for a few seconds to soften it.

    -I love the rustic, homemade look of the scissor cutting method, but a baking dish would work just as well.  I've used an oiled loaf pan before and made thicker "shards" of candy.


    Sunday, January 26, 2014

    Banana Bread...Kicked Up A Notch

    I don't think that I have ever met anyone that didn't like homemade banana nut bread.  I know that my family loves it and I can guess who I'm going to get messages from when this posts saying that they want a piece, are coming over or the popular question, "Where's mine?".

    I came across this recipe a little over a year ago (not sure where or I would definitely share!) and my first thought was, "You can make banana bread better??".  Why, yes, yes you can!  Whoda thunk it!  This recipe makes the bread so moist and flavorful that you just may toss out your tradition recipe... I did.  :)

    Banana Cream Cheese Bread
    Yields 1 large loaf or 4 mini loaves

    1 (8oz) pkg cream cheese, softened
    1c granulated sugar
    1/4c butter or margarine, softened
    1c mashed bananas (2-3 medium)
    1 1/2t vanilla extract
    2 eggs
    2 1/4c all-purpose flour
    1 1/2t baking powder
    1/2t baking soda
    1c chopped nuts (optional)

    Preheat oven to 350*.  Grease and flour loaf pan(s), set aside.

    In a large bowl, combine cream cheese, butter and sugar, beating until well mixed.  Add bananas, eggs and vanilla, mix well.


    Combine flour, baking powder and baking soda and add (slowly) to banana mixture and mix until just moistened.  Do not over-mix!! (I forgot to take a picture of this step :( Sorry!)

    Fold in the nuts.

    Spread in the prepared pan(s) and bake at 350* for 60-70 minutes for large pan or 35-40 minutes for small pans or until bread tests done. 


     Cool 10 minutes then remove from pan(s) and place on a wire rack to continue to cool.


    My notes:
    -If you've noticed the top of the bread getting too dark brown and the center not cooking, cover with foil.  The foil prevents the bread from getting any darker. 

    -I used my fancy-schmancy stoneware loaf pan and didn't have to use anything to grease the pan!  If you have one, I recommend using it. 

    -I didn't add nuts to my bread this time because my wife doesn't like them.  Yes, I know, she's weird.  But trust me, you don't miss them!

    -You could probably get away with dividing the dough between 2 large loaf pans since it rises so high in just one.  It's really whatever you prefer.

    Wednesday, January 22, 2014

    Balsamic Chicken... Fix It And Forget It

    I absolutely LOVE my slow cookers.  They have to be one of my favorite appliances, next to my Kitchenaid mixers, that is.  :)  Any time that I can find a recipe converted to a slow cooker one, I have to try it!  This is one of the newest ones added to my ever-growing collection.  Here's the recipe...

    Ingredients:

    4-6 boneless, skinless chicken breasts
    1 medium onion, thinly sliced
    2 14.5oz cans diced tomatoes
    4 garlic cloves
    1/2c balsamic vinegar
    1T olive oil
    1t dried oregano
    1t dried basil
    1t dried rosemary
    1/2t dried thyme
    salt and pepper

    Drizzle olive oil in the bottom of your slow cooker sleeve.  Add chicken and salt and pepper each piece.  Place sliced onions on top of chicken, then add all of the herbs and garlic.  Finally, add vinegar and tomatoes.  Cover and cook on HIGH for 4 hours.  Serving suggestion: serve over angel hair pasta.

    Before it cooked...


    My Notes...

    I used frozen chicken in this recipe today because I forgot to thaw it before hand, I just cooked it a little while longer.   Another reason I love the slow cooker!

    I'm also a HUGE fan of short cuts in the grocery store and let me tell you, companies are coming out with a lot of them lately.  For the garlic, I used the crushed garlic cubes found in the frozen section next to the veggies.  1 cube equals 1 clove.  I chose this because who wants a huge hunk of garlic accidentally being eaten?  This way, the garlic flavor is still there and it kinda dissolves in the sauce.  You can also get the jar of already minced garlic in the produce section.

    The frozen garlic that I bought looks like this...


    And here is the finished product (before plating, of course)...


    Tuesday, January 21, 2014

    Salted Caramels? Yes, Please!!

    If you're like me, you find making caramel intimidating.  I did, at least, until I made these.  Trust me when I tell you that they are heaven in your mouth!  Another great aspect... You can freeze them!  I love that part!  I made a whole batch and froze half of it.  When I had a craving, I pulled a few out and let them soften up a little, for about 15 minutes (so they wouldn't break my teeth) and then ate until I was satisfied.  Here's the recipe...

    Ingredients:
    1 1/3c heavy cream
    2c granulated sugar
    1/2c light corn syrup
    1/3c honey
    6T butter, cut into tablespoons
    1t vanilla extract
    3t sea salt (do not use kosher or table salt. It won't dissolve correctly)
    1 bag of 70% Cacao chocolate chips (Ghiradelli)

    1. Prepare an 8-inch baking pan by lining it with aluminum foil and spray the foil with nonstick cooking spray.
    2. Place the cream in a large saucepan over medium-high heat and bring it to a boil.  Stir in the sugar, corn syrup and honey until it begins to boil. Periodically (this is important!!), wipe down the sides of the pan with a pastry brush dipped in water to prevent sugar crystals from forming.
    3. Cook the candy, stirring occasionally, until it reaches 257 degrees on a candy thermometer.
    4. Remove the pan from the heat immediately and stir in the butter, vanilla and 2t of salt.
    5. Pour into the prepared pan and place in the refrigerator until  firm enough to cut.
    6. Cut the caramel into strips and then small squares using a chefs knife. (They are kinda rich so small squares work best for me, but make into whatever size suits you and your tastes.)
    7. After cutting the caramels, put them on a wax paper lined baking sheet so they aren't touching and place it in the freezer for at least 10 minutes.  The colder they are, the easier they are to dip in the chocolate.
    8. Place the remainder of sea salt in a small dish next to your work area so that you have it right at your fingertips when needed.  (You may need a little more than 1t.  Just add whatever you want to the dish.)
    9. Temper the chocolate and dip the caramels in one at a time, shaking (or tapping) of the excess.
    10. Place candy on a wax lined baking sheet and while the chocolate is still wet (almost set) sprinkle on the sea salt. If you do this while it is too warm, the salt will melt right into the chocolate.  If you wait too long, it won't stick.  Timing is everything!


    These are SO good!  I think I'm going to pull some out of the freezer now. :)  Until next time...
    Place the cream in a large saucepan over medium-high heat and bring it to a boil. Stir in the sugar, corn syrup and honey and stir until it begins to boil. Periodically wipe down the sides of the pan with a pastry brush dipped in water to prevent sugar crystals from forming
    Read more at http://tatertotsandjello.com/2012/12/happy-holidays-make-homemade-sea-salt-caramels.html#laHviGh1ReEyoH8h.99
    Ingredients:

    1 1/3 cup heavy cream
    2 cups granulated sugar
    1/2 cup light corn syrup
    1/3 cup honey
    6 tbsp butter, cut into tablespoons
    1 tsp vanilla extract
    3 tsp sea salt
    1 bag 70% Cacao Chocolate chips
    Read more at http://tatertotsandjello.com/2012/12/happy-holidays-make-homemade-sea-salt-caramels.html#laHviGh1ReEyoH8h.9
    Ingredients:

    1 1/3 cup heavy cream
    2 cups granulated sugar
    1/2 cup light corn syrup
    1/3 cup honey
    6 tbsp butter, cut into tablespoons
    1 tsp vanilla extract
    3 tsp sea salt
    1 bag 70% Cacao Chocolate chips
    Read more at http://tatertotsandjello.com/2012/12/happy-holidays-make-homemade-sea-salt-caramels.html#laHviGh1ReEyoH8h.99

    Sunday, January 19, 2014

    Minion Dave Has Arrived!

    After all the hard work that I put in, Minion Dave is here!  It took longer than I would have liked, but I think that he turned out great.  I am VERY proud of him.  I had a lot of errors that I had to fix and I also have to admit, the small cake was a little rushed.  It could have been better, but frankly, I was tired of looking at cake!  Hahaha.  My wife loved him and said that no one was to cut into him so everyone that was here for her party had to make do with the smaller cake.  They all said that it tasted good and I had to take their word for it because... I don't like cake.  Yep, I said it.  I'm a cake decorator and I don't like cake.  There are probably 2 times a year that I even want to try a piece and my own birthday is usually not one of them.  Don't judge me, I can't help it!  :)

    Oh!  And the surprise that I promised... It's a lotus candle!  You light the center of it and it lights smaller candles and then spins.  It's also supposed to play "Happy Birthday", but ours sadly didn't.  It's ok though, it was awesome without it!!!  Here are some pictures...


    This was Dave when he was finished.  The next day (today) is when I made the smaller cake and added the candle.


    This is Dave finished with the smaller cake.  I put the candle on (as you can see from the round dent in the small cake) and then took it off for pictures.


    And this is Dave finished with the candle!  Isn't he adorable??  

    In case anyone out there in blog reader land was wondering, the cake was all yellow with vanilla buttercream and marshmallow fondant (MMF).  All of which was made by ME! 


    Thursday, January 16, 2014

    The Eyes Have It!!

    My wife's birthday is coming up and when I asked her what kind of cake she wanted, the answer to the question should have been obvious.  A minion cake.  And not just ANY minion.  Minion Dave.  So after a week or so of planning and debating if he is going to be 3D or a flat shaped cake, I made the final decision.  He is going to be 3D with a little "smash" cake in front of him.  I think I may have bitten off more than I can chew... **sigh**

    I started on his details today so they had enough time to dry because I don't want things to get droopy.  I mean, who wants a droopy eyed minion on their birthday?  It took me an hour to get the goggles and eyes done and I haven't even assembled it yet!  Why, you ask?  Because my air brushing machine was acting hinky.  I had to disassemble it to see what was going on and get that thing running!  Now, I'm just waiting on things to dry then I will assemble the eyes and let that set up completely so it's ready for Saturday.  In the meantime, I need to get started on his hair.  I just took a minute to update you on what I have going on.  I can't wait to share the final cake and the "surprise" that I have in store.  :)


    Tuesday, January 14, 2014

    Learning To Be A Professional Cake Decorator...

    A few years ago, I started taking the cake decorating classes at the local craft store.  After realizing that the instructor was not as good as she should have been, I decided to not go anymore.  This was after taking 2 of the 3 courses that they offered at the time.  I figured that I had the basics, I had this under control.  Then reality set in...

    7 years later... I decorated a few cakes and giant cookies and things like that, but I was definitely far away from my goal of being able to make some money and produce some awesome cakes.  In those 7 years, I continue to purchase cake decorating supplies *just in case* and I have spent way more than I would like to say, but at least I have everything that I feel any serious decorator would have. 

    Last year, I bit the bullet and asked my cousin who makes AWESOME cakes to show me the basics of fondant and help me get started.  She was more than willing to help and I thank God for her every single time I attempt a cake.  Without her, I would still have a room full of supplies and no idea what in the world to do with most of them.

    I have since tried other mediums as well as fondant, such as modeling chocolate.  <---Love that stuff!  I am still by no means a professional, but I'm getting there.  I will attach a picture of the birthday cake that I recently made for my sister.  In the picture, you will see the cake that she wanted and the cake that I made.  I must say, I like mine better and so did she...THANK GOODNESS!  The owl is completely modeling chocolate (I'm kinda proud of that little bugger!!) as well as the borders.  The blue is fondant. (Sorry about the lighting!)


    Day one...

    A friend of mine just started a blog and I thought, why not?  I can do this.  I can write about the things that I do, cakes that I decorate, things that I bake, photos I take and so many other things that I do to keep myself busy.  Yep, I can do this.  Are you ready for this?  Heck, are WE ready for this?? 

    Here we go...